Gel Electrophoresis of Proteins
Casting Gradient Gels
Gradient gels are cast with a higher concentration of acrylamide at the bottom than the top. Gradient gel applications include the determination of protein molecular weights and the separation of molecules which co-migrate on uniform gels. Casting of gradient gels requires a gradient forming apparatus, and is more labor intensive than casting uniform percentage gels. For these reasons, precast gradient gels have become very popular. Their main disadvantages are their higher cost and limited shelf-life, which is less than 12 weeks in many cases.
Multiple gel casting units are available, particularly for mini-gel systems. The solutions given below are sufficient for 1 mini-gel, and can be scaled up as appropriate for multi-gel casters. Similarly, the protocol given is for casting one gradient gel. For multi-gel systems, follow the instructions provided with the unit.
Gradient Casting Apparatus

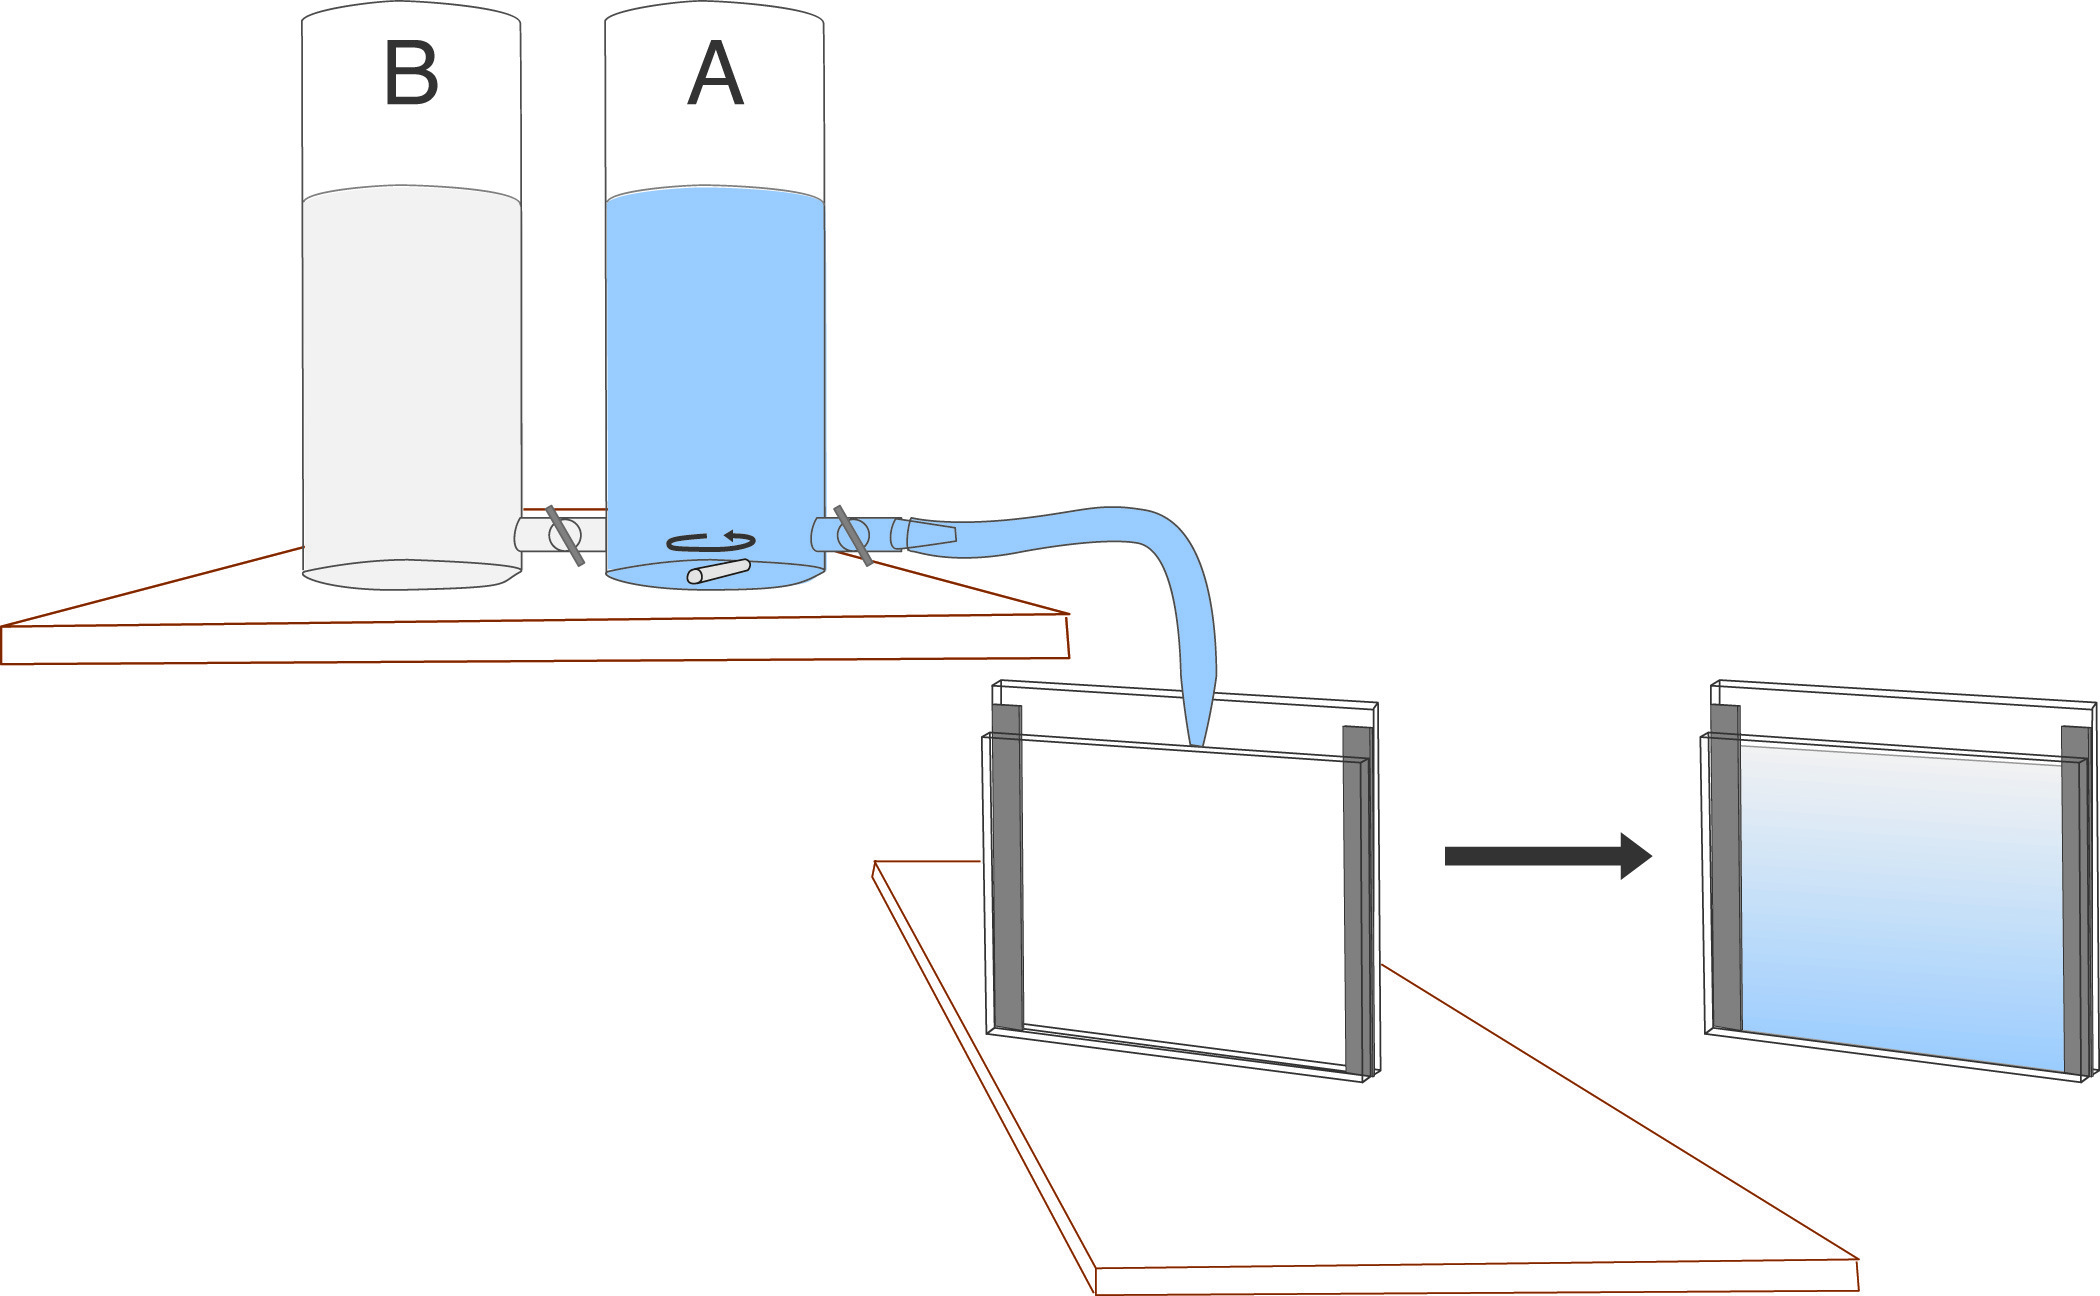
The gradient is formed with a gradient-maker. The gradient maker must be positioned above the gel cassette to encourage flow due to gravity, or it can be emptied through a peristaltic pump. Gradient makers consist of 2 containers, joined by a narrow connector at their bases, with one container (A) having also an additional outlet in its base. As the liquid is drained from (A), it is replaced from the other container (B) due to the equilibration of hydrodynamic pressure which keeps the levels in (A) and (B) equal. (A) is constantly stirred, which causes the solution draining from (A) to be progressively diluted with (B) until, when the gradient marker is emptied, the outflowing material is essentially 100% of the contents of the container (B).
Various shapes of gradients can be generated by varying the geometry of the system. In casting gradient gels, acrylamide monomer solutions are placed in the gradient maker, corresponding to the highest and lowest acrylamide percentages desired in the gel.
Pouring a Gradient Gel
-
- PREPARE THE HIGH AND LOW PERCENTAGE GEL SOLUTIONS
Table 1 gives suggested gel compositions for various ranges of protein size. The table below gives formulations for the high and low percentage solutions to make these gels. Each solution will account for 1/2 of the total gel volume; to prepare a gradient that fully covers the desired range, both solutions must be completely consumed. The high percentage solution is subject to polymerization after ammonium persulfate addition, even in the absence of TEMED. For this reason, do not add ammonium persulfate until ready to pour the gel, do not de-gas the solutions (de-gassing removes polymerization inhibiting O2), and keep the solutions cold prior to ammonium persulfate addition.Table 1: Effective Separation Ranges of Gradient Gels
Gel % Size Range (kp) 5-15 20-200 5-20 10-200 8-15 10-100 8-20 8-150 10-20 6-150 Table 2: Gradient Gel Composition Solutions
Monomer % ProtoGel (30%; 37:1 Acrylamide:MBA) (mL) ProtoGel Buffer (1.5 M Tris-HCl, pH 8.8, 0.4% SDS) (mL) Deionized Water (mL) Sucrose (g) Upper Solutions 5 3.3 5 11.6 --- 6 4.0 5 11 --- 8 5.3 5 9.7 --- 10 6.7 5 8.3 --- Lower Solutions 10 6.7 5 6.7 3 12 8 5 5.3 3 15 10 5 5.3 3 20 13.3 5 0 3 - PREPARE THE CASTING APPARATUS
- Assemble the gel cassette. Seal the bottom per manufacturer's instructions, or use a molten solution of 1% agarose, allowing it to penetrate the bottom of the cassette by capillary action to a depth of 1-2 mm.
- Place the gradient maker on a stirring stand so that the bottom of the chambers are higher than the top of the gel cassette. Place a stir bar in each chamber. Attach a narrow bore tygon tube to the outflow. Attach a pipette tip to the other end of the tube, and clamp into position so that the outflow is directed into the cassette from the top center. Angle the cassette slightly to allow the solution to run down the tall plate.
- Close the stopcock between the gradient maker chambers and the outlet from the gradient maker. Place the low % gel solution into the non-outlet (reservoir) side of the gradient maker. Open the stopcock between the two chambers and allow 0.1 - 0.3 ml of solution to flow through to clear any bubbles.
- Place the high % gel solution into the outlet side (mixing chamber) of the gradient chamber. The next steps must be carried out rapidly, to avoid polymerization of the solutions before the gel is fully cast.
- Start mixing in the gradient maker.
- PREPARE THE HIGH AND LOW PERCENTAGE GEL SOLUTIONS
- CAST THE GEL
- Add the specified amounts of APS and TEMED to each chamber. (Per 100ml of casting solution, add 1.0 ml of 10% APS and 0.1 ml TEMED.)
- Open the stopcock between the chambers. Some backflow into the low % reservoir may occur, due to the density variation between the solutions. It will not substantially alter the final gradient. Open the outlet, at a flow rate that will drain the solutions in 5 - 8 minutes. The faster flow will cause turbulence in the gel which will disrupt the gradient. Slower flow rates will allow polymerization to occur before pouring is complete.
- When all of the solutions is dispensed, remove the pipette tip from the top of the cassette. Overlay the gel with water-saturated n-Butanol. Flush the gradient apparatus immediately with water to prevent polymerization within the system.
- After one hour, cast a stacking gel as detailed in the protocol for casting Laemmli gels.
NOTES: A peristaltic pump may be used to regulate the flow from the gradient maker. Gradient gels without stacking gels may be stored for up to 1 week. Multiple gel casters are available from many manufacturers. Specific protocols optimal for each system are provided with the equipment.
NEXT TOPIC: Measuring Molecular Weight with SDS-PAGE
